

Brake pads are a critical component of your vehicle’s braking system, responsible for creating the friction necessary to stop your car. Over time, these pads wear down due to constant use, diminishing their effectiveness and compromising your safety on the road. Therefore, it is essential to regularly inspect and replace worn out brake pads to ensure optimal performance and safety.
Knowing when to replace brake pads can save you from expensive repairs and potential accidents. Signs such as squeaking or grinding noises, decreased braking responsiveness, or a warning light on your dashboard indicate that your brake pads may be nearing the end of their lifespan. This guide provides step-by-step instructions to help you replace your worn out brake pads safely and effectively, empowering you to take control of your vehicle’s maintenance.
Whether you’re a seasoned DIY enthusiast or a beginner, understanding the process of brake pad replacement is crucial. It involves more than just swapping out parts; it includes ensuring the integrity of the entire braking system. Take the time to carefully follow the recommended steps in this guide, and you’ll not only enhance your car’s performance but also ensure a safer driving experience.
Tools You Need for Brake Pad Replacement
Replacing brake pads requires specific tools to ensure the process is safe and efficient. First and foremost, a hydraulic jack or a floor jack is necessary to lift the vehicle and provide access to the wheels. Pair this with jack stands to securely hold the vehicle in place while you work.
A lug wrench is essential for removing the wheel nuts, allowing you to take off the wheel and reach the brake components. Additionally, a c-clamp or brake caliper tool is needed to compress the caliper piston, facilitating the insertion of new brake pads.
A socket set, preferably with a ratchet, is vital for loosening and tightening bolts on the brake caliper and mounting bracket. A torque wrench ensures that you accurately fasten fasteners to the manufacturer’s specifications, which is crucial for safety during operation.
Brake cleaner is recommended to clean the brake components and remove dust and debris before installation. A wire brush can assist in cleaning any rust or corrosion on the caliper and mounting surfaces. Lastly, having gloves and safety glasses will protect your hands and eyes, ensuring a safe working environment throughout the brake pad replacement process.
Step-by-Step Process for Installing New Brake Pads

Begin by gathering all necessary tools and materials, including new brake pads, a jack, jack stands, a lug wrench, a C-clamp, and brake cleaner. Ensure you work in a well-ventilated area and prioritize safety by wearing appropriate gear.
First, loosen the lug nuts on the wheel where you will be replacing the brake pads. Do this while the vehicle is still on the ground to prevent the wheel from spinning. Once loosened, use the jack to lift the vehicle and place jack stands securely below the frame for safety.
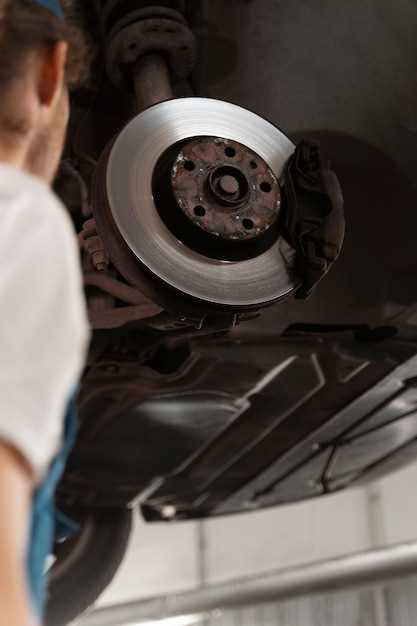
Next, fully remove the lug nuts and take off the wheel to gain access to the brake components. Inspect the brake caliper and locate the bolts securing it in place. Use the appropriate socket or wrench to remove these bolts, allowing the caliper to swing away from the rotor.
Carefully slide out the old brake pads from the caliper bracket. Take note of their placement for proper installation of the new ones. Before installing new pads, use brake cleaner to clean the caliper and rotor, removing any dust or debris that may cause noise or interference.
Now, position the new brake pads in the caliper bracket, ensuring they align correctly as per the original pads. If the caliper pistons are not fully retracted, use a C-clamp to compress them back into the caliper housing, creating enough space for the new pads.
Once the pads are installed, carefully reattach the caliper over the new pads. Secure the caliper by tightening the caliper bolts to the manufacturer’s specified torque settings. Double-check that the caliper moves freely and is not binding.
After securing the caliper, reattach the wheel and hand-tighten the lug nuts. Lower the vehicle from the jack stands and then fully tighten the lug nuts in a crisscross pattern to ensure even pressure. Be sure to pump the brake pedal a few times before driving to seat the new pads properly.
Finally, test the brakes at low speed in a safe area to ensure their effectiveness. Check for any unusual noises or issues, and perform a visual inspection of the brake components once more before regular driving.
Common Mistakes to Avoid During Brake Pad Replacement
When replacing brake pads, it is crucial to avoid several common mistakes that can compromise safety and vehicle performance. One of the most frequent errors is neglecting to inspect the condition of the rotors. Worn or damaged rotors can lead to uneven wear on the new brake pads and decreased braking efficiency. Always check for any grooves or significant wear on the rotors before installation.
Another mistake is failing to clean the brake caliper and surrounding components. Dirt and debris can interfere with the proper functioning of the brake system. Make sure to clean all surfaces where the pads come into contact with the caliper and rotor to ensure proper operation.
Using incompatible brake pads is also a common pitfall. Different vehicles require specific types of brake pads tailored to their braking systems. Always verify that the pads match your vehicle’s make and model to avoid performance issues.
Additionally, not properly aligning the brake pads during installation can lead to increased wear and noise. Misalignment may cause the pads to contact the rotor unevenly, resulting in poor braking performance and premature wear.
Lastly, skipping the break-in period after installing new pads is a mistake that can affect their longevity and effectiveness. Follow the manufacturer’s recommendations for bedding in new brake pads to ensure optimal performance and extend their lifespan.


